This is one of the very cheapest ways to rig a lug rig sailboat developed in five years of sailing the Oz Goose sailboats In the Philippines. Many of the normal sailboat parts are not available – but we race the boats so they have to be set up right. Cheapness and efficiency can co-exist.
Why we have learned a lot about cheapness and reliability – 112 boats sailing and racing regularly.
Detailed photos and explanation down the page
For information on Building and sailing an Oz Goose
- BUILDING VIDEOS -Our Step By Step How to Build an Oz Goose Sailboat
- Building the Oz Goose sailboat for peanuts
- Some of the sailing performance of the Oz Goose
- Video – one of our Regattas – 17 boats – this year 32 boats!
- How the Oz Goose goes together – CAD drawings
- Ropes sizes and Fittings needed for the Oz Goose and a Supplier
Reliability is important when taking care of 100 boats!

Because we have over 100 oz geese in the Philippines and we can get none of the normal boat fittings – and there is no budget for them anyway – we have found ways of substituting rope for expensive fittings.
Many of these methods are quite traditional, which shows how the wheel turns!
Our fittings list for racing looks like this
- Rudder fittings
- Three mainsheet blocks
- Plastic Horn cleat for halyard.
- Stainless ring at top of mast.
- Fitting attachments – 4mm spectra line
- Downhaul, outhaul – 4mm spectra line
Compare with any other boat – there are other simple boats, but the costs of all the bits can result in a price well beyond that of a freestanding rig with lugsail on the Oz Goose. You can apply it to your boat for significant savings.
Yet we get full racing efficiency from good sailshape and rig setup. It has to be or the boat will be toast in our regular racing program.
First time you rig takes longer than normal rigging to go sailing – Video
Video 1 below
The goose takes about 10 minutes to rig. But the first time you rig will take a lot longer.
This is Part 1 showing how to rig the boat. Part 2 will show a neat way to unrig the boat so it is ready to put together in 10 minutes next time. Subscribe top right to receive email when part 2 is out – no spam – promise.
Here is a link to the rope sizes and the few fittings required to rig the Oz Goose
And all the knots – What knots do I need for rigging a lug rigged sailboat
One of the advantages of being involved in a class boat, where there is racing is that there starts to be sharing of information and you can start to see what works and what doesn’t.
Also we can get an understanding of what is durable and what can be simplified.
There are only lessons available if the boat is lightened and simplified. Go too far and bits start breaking.
But going heavier and stronger is a philosophical dead end. If it didn’t break or cause problems before, and now you make it stronger – so what!? Weight, complication, labour and expense for no good reason.
All our Lug Tweaking Links are Here
This video covers the steps below. It does have some peculiarities as it involves the kit we use here in the Philippines. But all the major parts are correct. More details and photos below.
Attaching corners of sails to spars (lug sail yard and boom)
- Corners – 4mm spectra for corners – can strip polyester outer to reduce rope diameter – all the strength is in the inner rope. Keep the outhaul outer though as it gets retied.
- Lacing – 3 or 4mm nylon or polyester

This is the most important principle for any boat. The following is our recommended lug rig method.
Front of boom needs two holes of 6 to 9mm diameter. Front hole 20mm from front of boom. Second hole 45mm from front of boom.
Same with Front of Yard.
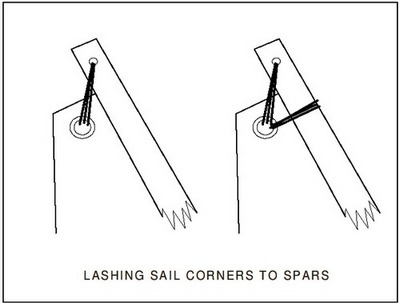
Often you see corners lashed as in the picture on the left – a gap will open up between the corner of the sail and the spar – this means the shape you paid the sailmaker will not be in the sail.
The picture on the right is the correct way. We usually use the white spectra of small diameter by taking the spectra internal out of the coloured cover of the 4mm rope. This is nice and small so doesn’t block the the eye up.
Back Holes
The back hole for attaching the sail to the yard and the boom location is found by stretching out the edge of the sail once the front it lashed. Put a mark on the boom at the point the sail comes to, then put a mark an extra 75mm along the boom from there. Put a 6 to 9mm hole through the yard or boom 75mm from where the corner of the sail comes to.
Initial Tension
The sails need to be pretensioned on the spars. This means that there should be a crease in the sail along the length of the yard. Don’t sweat it really tight – generally I pull it tight to see a definite crease but then ease it so the crease is almost disappeared.
After that the sail is laced with the VB cord (3 or 4mm nylon or polyester) as below. Pull it very tight.

The rope for the outhaul (4mm spectra) at the end of the boom breaks the rule – it only ties the sail out to the end. We hold the sail close to the boom with the mainsheet.
But the bottom of the sail doesn’t get tensioned too tight yet. Explained below. So just tie it off with a small amount of tension for now.
The two permanent fittings on the Goose hull – downhaul loop and traveller
One of the big cost savings when rigging the Goose is to forget manufactured fittings for attaching these major components to the hull. With so many boats used heavily we have found these setups last two to four seasons. And when the polyester outer shows signs of wear the high strength of the spectra inner layer is still fully functional. So when the outer is chafed and you can see the inner … it is a warning that replacement should be soon, but definitely still OK to go sailing.
- Traveller – 4mm spectra with polyester outer
- Downhaul loop – 4mm spectra with polyester outer
- Traveller block – non ball bearing block to take 6mm rope preferably non swivel
A nice example of simplifying is the downhaul attachment for the sail tensioning. It is hard to get a stainless steel saddle or a deck eye in the Philippines, so we started doing spectra (or dyneema) loops. See the small loop of blue rope in the green deck close to the left side of the mast. When I specify spectra, I mean it.
Hardware grade ropes will not be enough for any halyard, downhaul or traveller components. Don’t use Vectran as it deteriorates quickly in the sun.

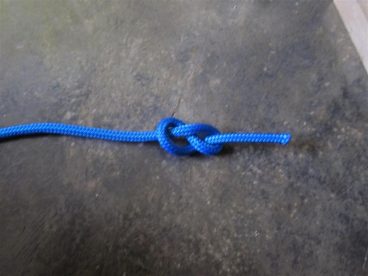
4mm spectra line through a 5mm hole with a figure 8 knot in both ends under the deck – on the Left/Port side of the mast – keep the loop as short as possible. The holes go through the timber that supports the mast. The area underneath is open and is not buoyancy. This method and rope size works fine for the Goose and the Goat Island Skiff.
One useful thing – even though the loop is to be as small as possible leave the end of the rope 100mm (4″) too long beyond the knot on one end – in case you ever want to undo the knot and do it up again later.
Figure 8 knot. There are many great video tutorials for knots on youtube. Here is our collection for the lug sail rig.
There is no theoretical reason for putting the loop on the same side as us … just to make all the boats rig similarly and make it easier to explain … so we always put the downhaul loop on the left (port) side of the deck as you look forward.
There is a little rationalisation though. With the boat set up this way it is dead easy to go fast on the port tack (non right of way) and while equally fast on the other tack – the groove is a bit harder to find … but you have right of way over other boats to give you space to find the groove.
Spectra is quite cheap now. It is low stretch, abrasion resistant and UV resistant. Using any other type of rope here would end it tears in the short to medium term for a large proportion of users – we put a huge amount of load on our downhauls.
There! That is the advantage of a having 16, now (as of last weekend) 26 Oz Geese sailing in the Philippines. (Now 2020 it is 73 Oz Geese) (2022 now 112 Oz Geese).
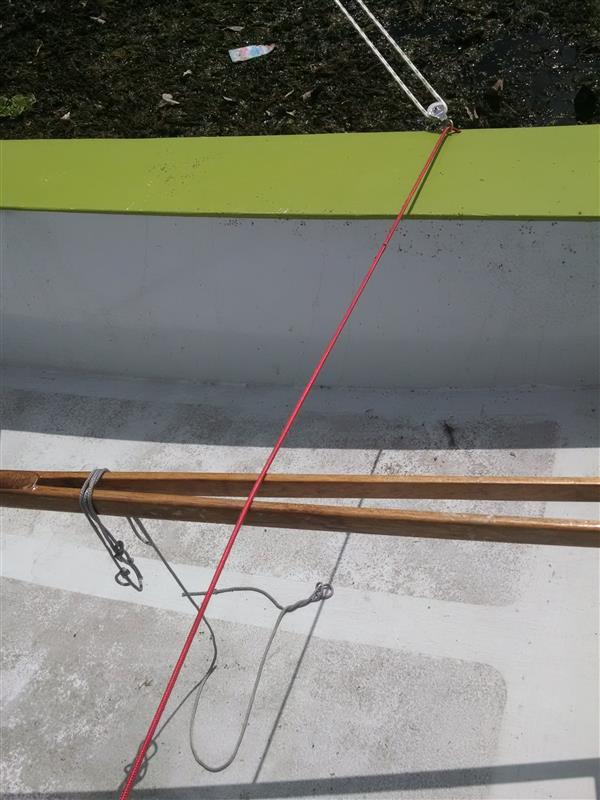
The other place where we use a similar simplification is the traveller – red rope in the photo below for the mainsheet block. It is suitable for the front sail. If your boat has a jib, you should not use such a traveller for the mainsail but a bridle with a central loop and instead of being as tight as possible it should be as loose as possible. This is because if the mainsail is used with a jib it needs to be brought in to a tighter angle. But with a single sail here or any sail at the front the normal tightest sheeting angle is 10 degrees from the centreline. At least until you get up to very fast boats like the faster catamarans and the like.
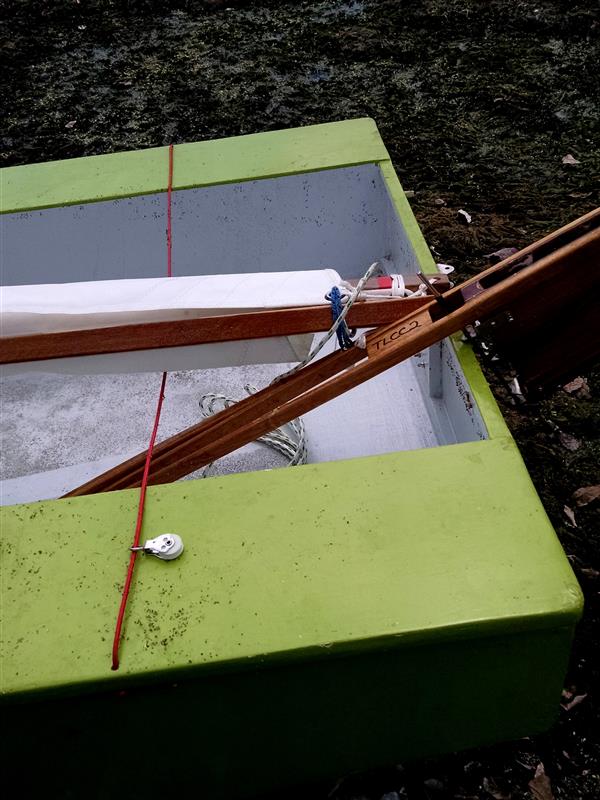
For the goose only the distance of the holes from the back of the boat is 420mm They are drilled straight through the 19x19mm epoxy glued gunwale – be careful if using other glues for construction you might need screws to prevent the gunwale breaking off. The holes are 5mm through the gunwale as close as you can get to the hull ply (measure please) and the spectra rope is 4mm (that’s OK up to and beyond the 105sq ft Goat Island Skiff Mainsail)
Put the block on the traveller before tying the second end. Leave the rope over length by about 150mm on one end as mentioned before. The spectra will stretch first time it is used so we tie it off with a figure 8 knot under the gunwale both ends so the rope doesn’t sag excessively and then heave on the middle of the traveller mightily to stretch the spectra.
This makes it loose enough for good speed in light and medium wind (sheeting comes inward and it still moves outward when reaching or in strong winds.
GOFAST TIP – put tape around the traveller block if it is a swivel type as shown to prevent it from swivelling. You will get fewer twists in the mainsheet – a cable tie to secure the rotating part of the sheave to the fixed part works too.
So that’s the setup of the hull.
Setup of mast fittings on a freestanding lug rig
- 4mm Spectra Loop for attaching halyard ring – for boats larger than the goose a block can be attached the same way.
- Halyard Ring – 25mm (1″) diameter from 6mm (1/4″) rod.
- Plastic horn cleat 100mm (4″)
Only two fittings on our normal mast setup.
Fitting at the top on back of mast has two options.
The new way are two holes 5mm at top of mast. One 20mm from the end of the mast, one 40mm from the end of the mast. We put a stainless steel ring on a piece of spectra and feed it through the two holes and tie figure 8 knots. Tie it as short as possible to keep the ring near the top of the mast. Area of holes should be fibreglassed taped with two layers 75mm (3″) wide glass twice around tip of mast to prevent the holes elongating.
The ring is adequate for light dinghy rigs up to around 90sqft (around 8sqm). Above that size consider using a pulley block.


The old way is a substantial plastic deadeye (12mm minimum eye) with two stainless machine screws (bolts or metal threads – names in different countries) (3/16″ or 5mm) diameter threaded into the mast by 25mm (1″) – Holes predrilled at 4mm or 3/32″ diam) – you don’t need to go nuts with length. We put epoxy in the holes so these fittings become very permanent. This halyard fitting needs to go as close to the top of the mast as possible with the top machine screw about 15mm from the top of the mast.
Here stainless rings are about $2 and locally made. where a strong deadeye is about $15 and has to be imported. Even from a regular marine supplier the ring and spectra is much cheaper than the manufactured deadeye.
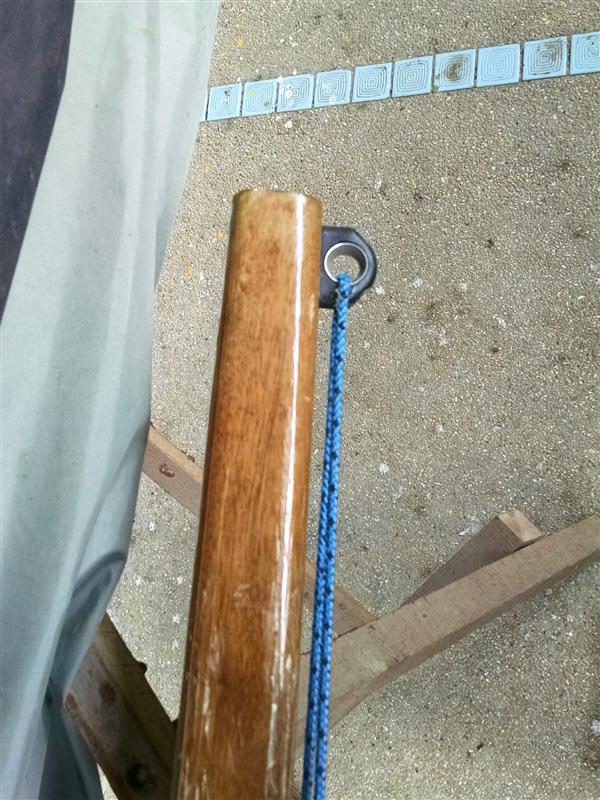
We have also used a strong small pulley on a rope loop similar to the downhaul loop on the deck (top photo) but the pulley needs to be strong and light. This tends to be better for bigger sails like the 105sqft (9.7sqm) of the Goat Island Skiff. Hardware cast stainless or brass pulleys will just break under the downhaul loads needed for speed and long term reliability.
Halyard cleat – 4″ or 5″ (100,125mm) plastic with two holes – mark a position on the mast 850mm (2’10) from the base. Put the mast in the step and drill on the opposite side to the downhaul loop already fitted through the deck next to the mast. Use two bolts that extend out the bottom of the horn cleat by 25mm (1″). Holes (4mm or 3/32″). Epoxy in holes and on the threaded part of the metal threads before final assembly.
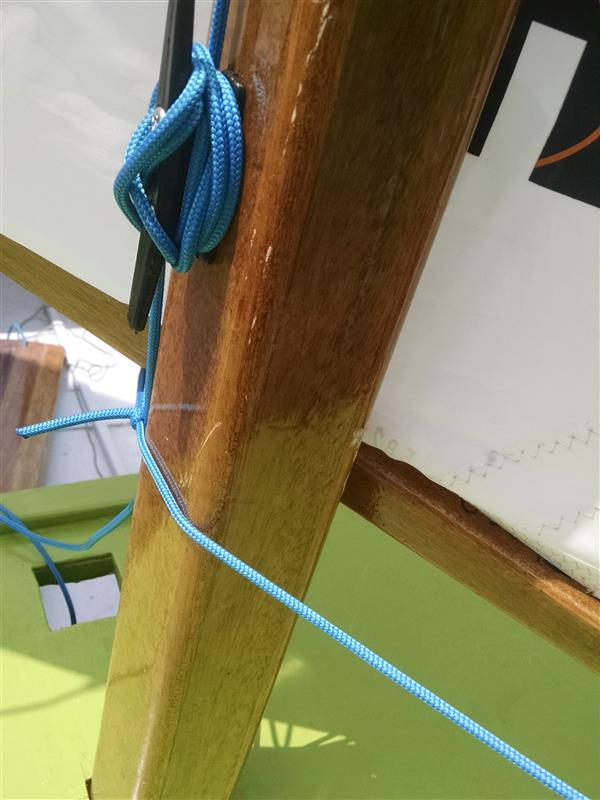
Mast finished.
A note for boats other than the OZ Goose that are using this guide
The aim of setting up the sail is to reproduce as far as possible the designer’s sailplan drawing in the plan.
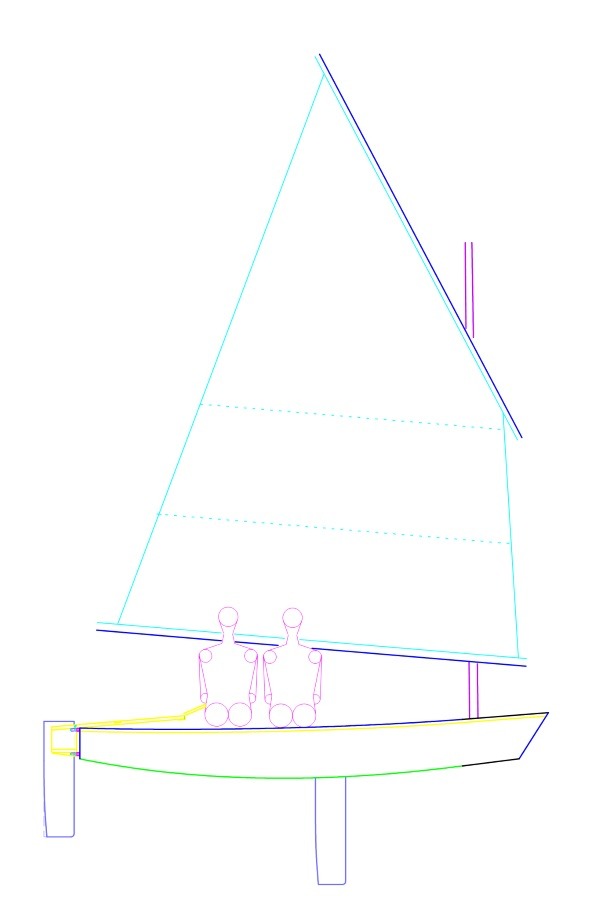
Here is my drawing of the goose sailplan
And here is the photo of a rigged boat. The sail looks a bit different because it is 3D and not perfectly lined up with the centreline of the boat as in the 2D drawing. But you can see the boom angle is similar, the amount of sail in front of the mast is similar, the angle of the luff (the front edge of the sail0 is about right relative to the mast angle.
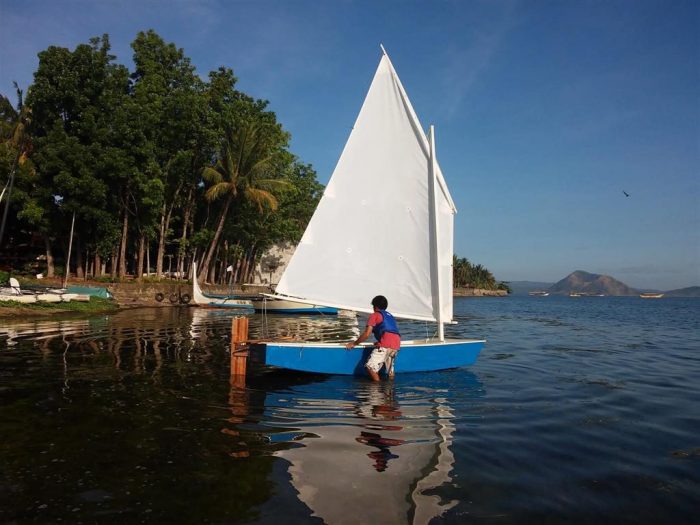
The angle and position of the sail is adjusted with the position of the triple loop along the yard and the position of the downhaul on the boom with some assistance from the preventer/bleater (all explained below).
If you boat is a bit of a dog to sail, this is the first thing to check – a photo against the designer’s drawing to make sure the sail is in the right place. Second thing to check is downhaul tension. Third thing to check is the depth of the foot (bottom) of the sail is around 1 in 10.
From Here is to prepare the boat for going sailing when beside the water
This is our video, but the notes below are very useful too.
Hoisting the sail
- Halyard has options
1/ 4mm spectra with polyester outer.
2/ 3mm spectra 12 braid – no outer – but it is slippery so have to put many more turns on the cleat when cleated. - Loops for halyard to attach to yard – 4mm spectra
The halyard is 4mm spectra. In the Philippines all the boats we make have a blue coloured halyard. The rope that pulls a sail up is called a halyard.
It is important that the halyard not be too large diameter. These high strength ropes require smaller diameters so that the weave of the rope has adequate tension to pull straight – this geometric stretch has to happen before the tensile strength and stiffness of the spectra will do its low stretch magic.
The halyard is normally stored on the mast ready for pulling the sail up.
Put the mast in the forward mast step. You can see the downhaul loop in the deck on the port side (just visible) and the mast goes in so the cleat is on the opposite side to the downhaul like the photo below.
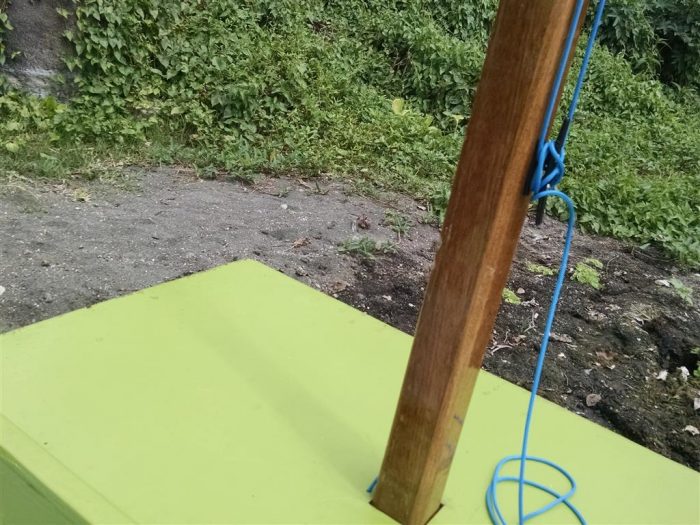
Put the sail on the same side as the downhaul loop with its front end forward. The front end has two holes in the wooden pieces (spars) tied along the top and bottom edge of the sail.

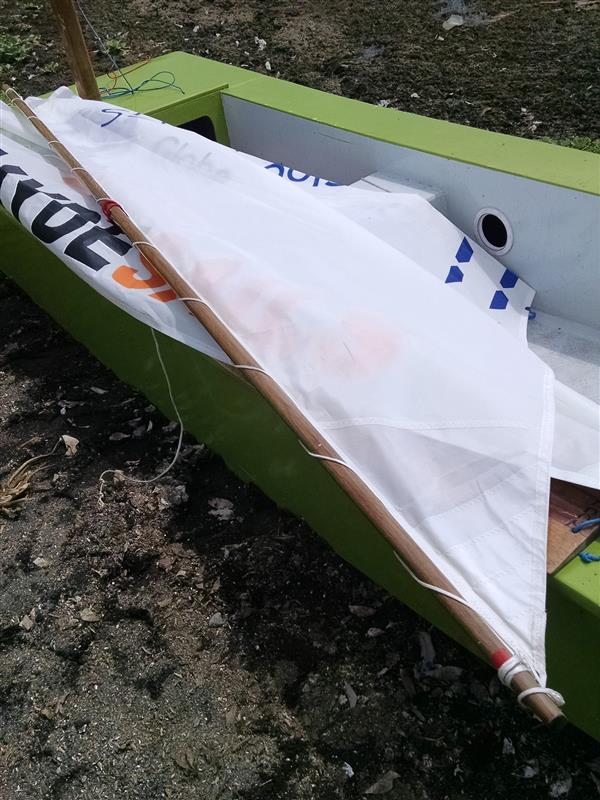
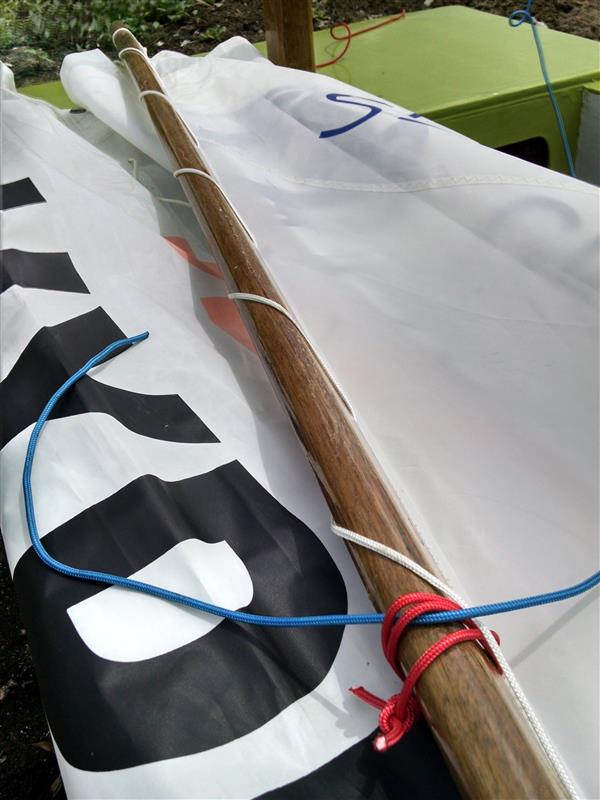
The yard is the smaller of the two pieces of wood attached to the sail. The blue halyard goes from the top of the mast through two of the loops placed in the middle of the yard (here in red) and then continues forward toward the mast. The final loop of the red rope will pull tight around the yard and prevent the halyard from sliding around.
You can also see that the yard is the wooden piece attached to the diagonal edge of the sail. The bigger peice of wood is the boom and the corners of the sail attached to the boom are close to 90 degrees. Note the apex of the sail in the photo below, it is the top corner.
Close up of the red loops and the blue halyard. Front of the boat is the end farthest from the camera. You can see the mast. For the Oz Goose the loops are exactly halfway along the yard. Other boats might be slightly (but not greatly) different unless they have very short masts.
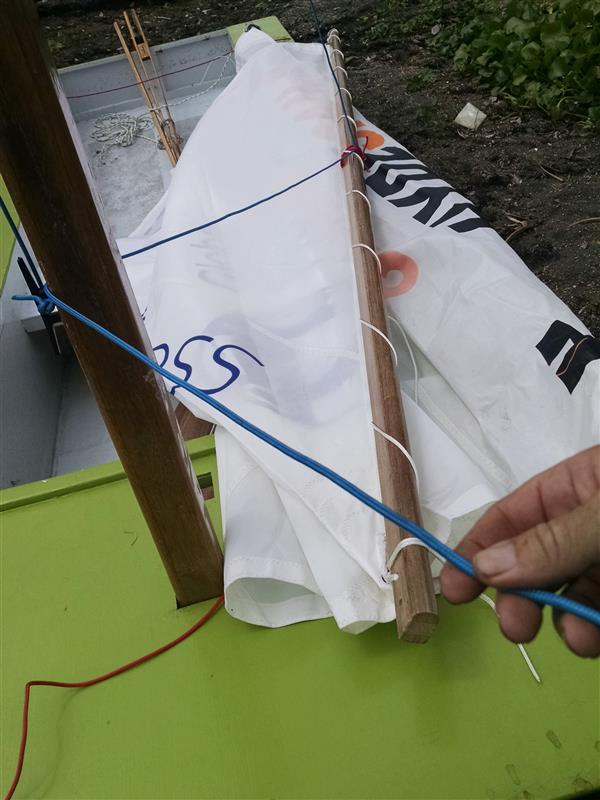
The halyard then goes on the opposite side of the mast just resting on top of the cleat as shown here.
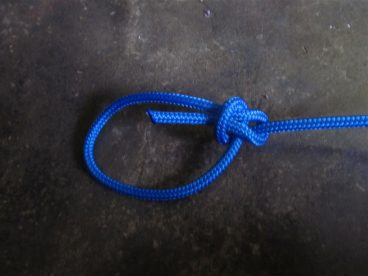
It then ties through the forward hole in the yard using a bowline knot.
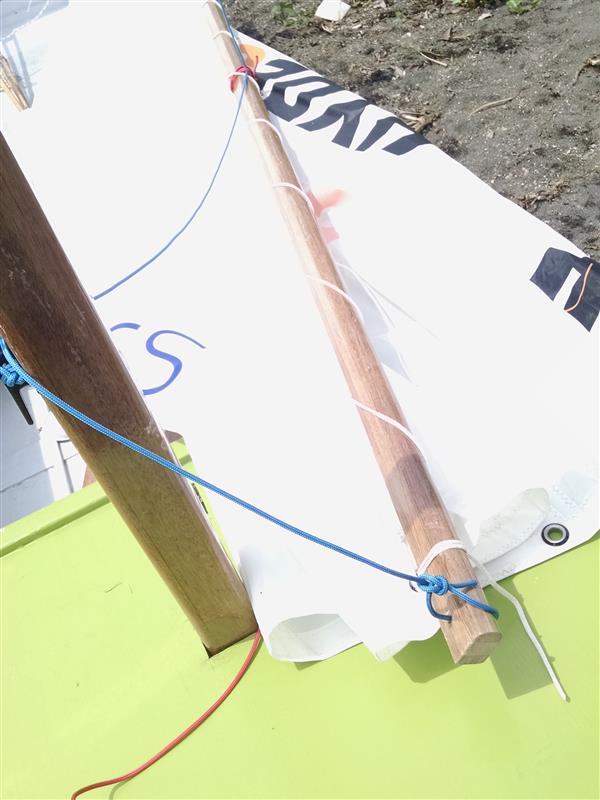
Bowline Knot is in our knot method videos for lug sail rigging.
Feel where the wind is coming from. Turn the boat so that the front of the boat is closer to the wind. Now the sail can be pulled up. If there is a lot of wind have a friend hold the front of the boom as the sail goes up. This is my friend Job hoisting the sail. (Now you know why the rope is called a halyard – it means “haul yard”.
In the photo below you can see that the tension from pulling the sail up tensions traps the mast between the halyard and the yard. See the track of the blue rope and how it will hold the yard close to the mast.
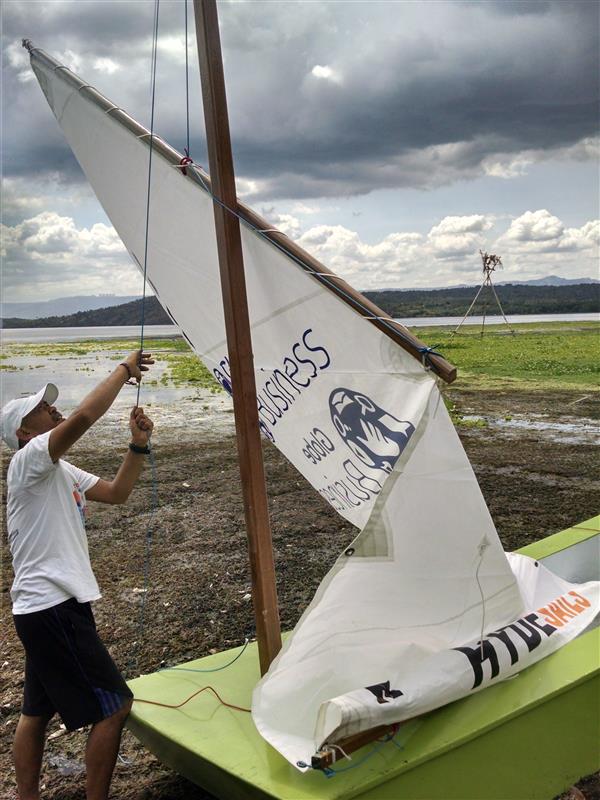
The sail needs to be hoisted until the front end of the boom is about 400mm (16″) above the deck. If the mast is a bit shorter than will allow that then pull the halyard so the yard hits the top of the mast, and then drop the halyard down by 50mm (2″) to give a bit of slack so the yard can rotate when sailing.
Tying off around the horn cleat
There is a lot of advice about this that I disagree with strongly.
I was told a long time ago by one of the old time wharf workers that you should never, ever use a knot to finish off tying around a cleat. One day it will pull tight and it will be impossible to undo. Cutting highly tensioned ropes is a very dangerous past-time. I recommend handling small boat ropes the same way you handle big boat and mooring ropes.
This is the way I was taught. I take the end of the halyard permanently through the hole in the base of the cleat (if there is one – it is tidy that way.
First do a full 360 loop around the base of the cleat. If the cleat has been designed properly this provides about 70 percent of the holding power as the second time around will sit on top of the first time, jamming the rope.
(note if you are using the “naked” 12 braid spectra with no polyester outer I normally do three or 4 times round – it is pretty slippery otherwise)
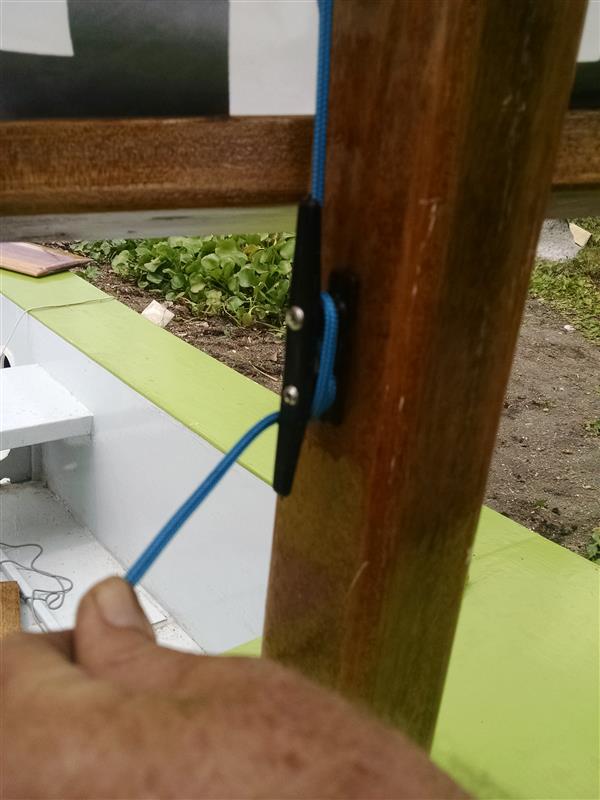
Next you do one or two figure 8 patterns around the horns.
(with the slippery “naked” spectra I do this 4 times pulling it carefully tight each time.
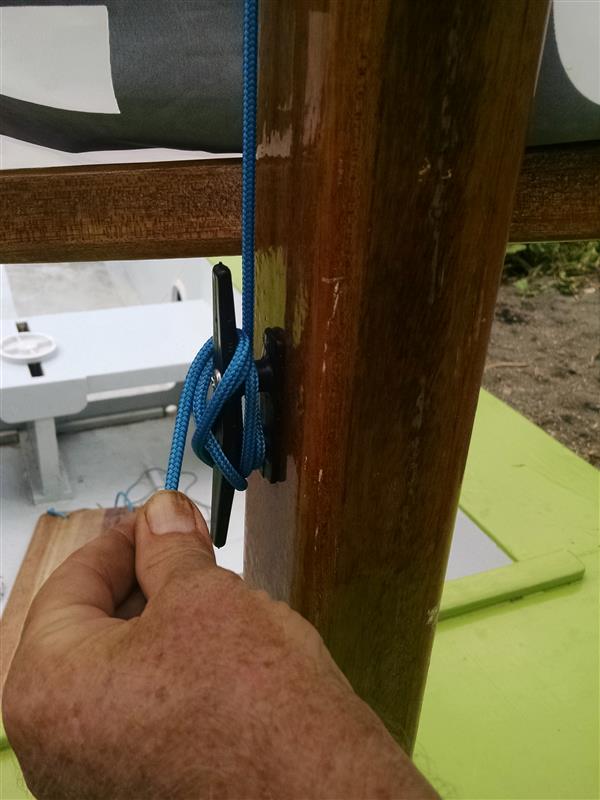
Then you finish off by going around the base several times (three or four) and pull tight.
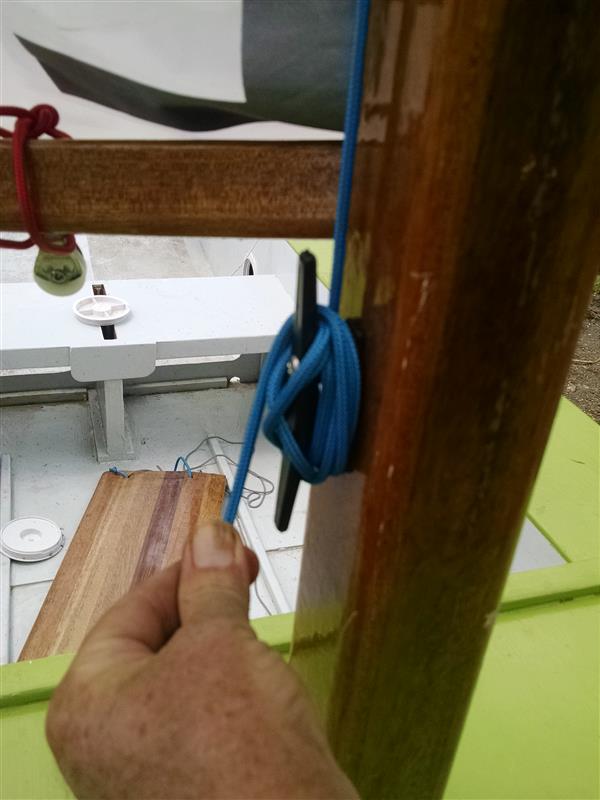
There is no twisted loop knot over one of the horns – no final half hitch – ever! Thank goodness for the advice. I’ve dealt with boats that have been hung by their marina ropes when the tide has gone out – and seen halyards having to be cut on larger boats when someone has fouled up.
The old salty guy, who we all called “Farmer Bob”, long dead now, had spent 7 decades around the waterfront (and that was 35 years ago). Seemed grumpy, but I think he saw lots of examples of people doing things in ways that could get other people hurt. He would grumble quietly “Unnecessary … Unnecessary” and shake his head as he walked past such examples.
So that’s the sail pulled up.
Next .. the Downhaul – the most important rope on the boat for performance.
Secret to good performance on lug rigs – downhaul tension
- Downhaul – 4mm spectra with polyester outer – 2.5m (8ft)
Just a note for the racers and people who know about rigs already. The downhaul on a balance lug like the goose has two functions. It acts like a downhaul/cunningham but it also works like a boom vang to control sail twist. Add that it acts like forestay tension for the unsupported lug luff and you see its importance. Think of vang tension and you know it has to be very tight in most conditions.
The downhaul is permanently tied around the boom 250mm (10″) behind the metal eye in the sail – tie a figure 8 knot in the end of the rope and then do a clove hitch knot with that same end around the boom. Pull it really tight so the figure of 8 jams against the clove hitch.
Clove hitch with Figure 8 knot (see our knot videos page)- the photos of the green boat below this loose example show how tight it has to be – the red rope. Also make sure that when it is tight that the Figure 8 knot is against the underside of the boom.
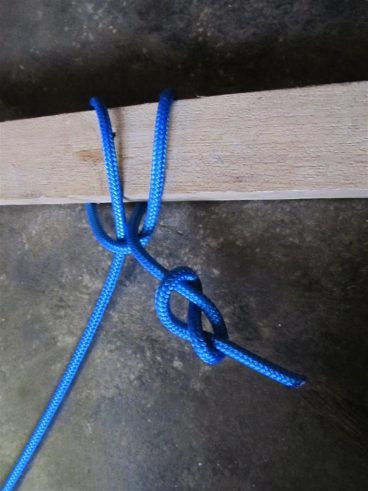
This needs to be pulled super tight so the figure 8 pulls up against the clove hits and jams the whole knot tight around the boom
You can see the red rope is tied around the boom. This knot is chosen because it jams in position. Take the red rope through the spectra eye in the deck beside the mast.

Next the downhaul goes over the boom again. Keep this second up and over the boom behind the clove hitch knot. Not in front – if in front it will slide forward and loosen the downhaul.
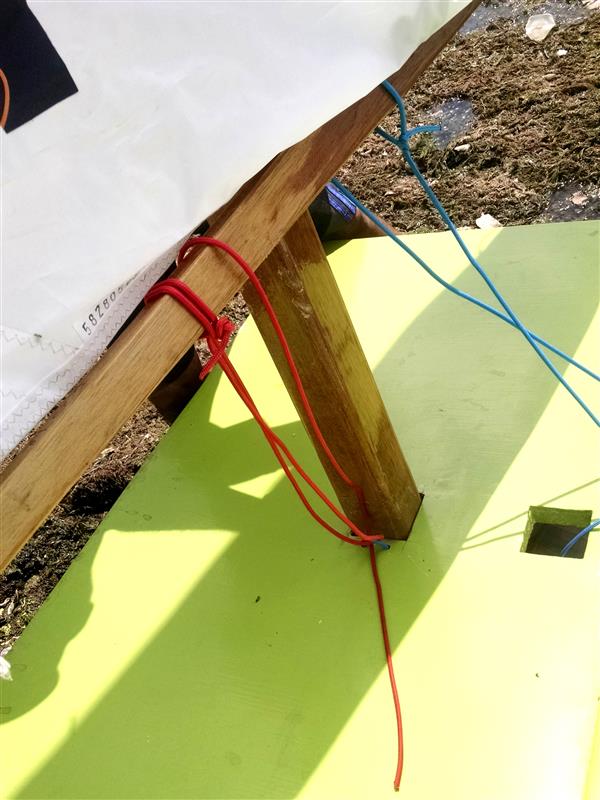
The only time the downhaul should be a little loose is if the wind is so light it is difficult to get any boat sailing. As soon as there is enough wind to get the boat moving the downhaul needs to be very tight. In strong winds you have to go crazy with tension as this helps reduce excessive power from the sail.
GOFAST TIP – Downhaul tensions
- Very light winds – can’t get boat moving – get rid of slack but only light tension
- Light winds but boat moves OK – very tight downhaul
- Strong winds – unbelievable super tight downhaul
Today it is about 5 knots of wind. Light but the goose will move well so Job is pulling on the downhaul and pushing down on the boom at the same time to make the downhaul very tight.
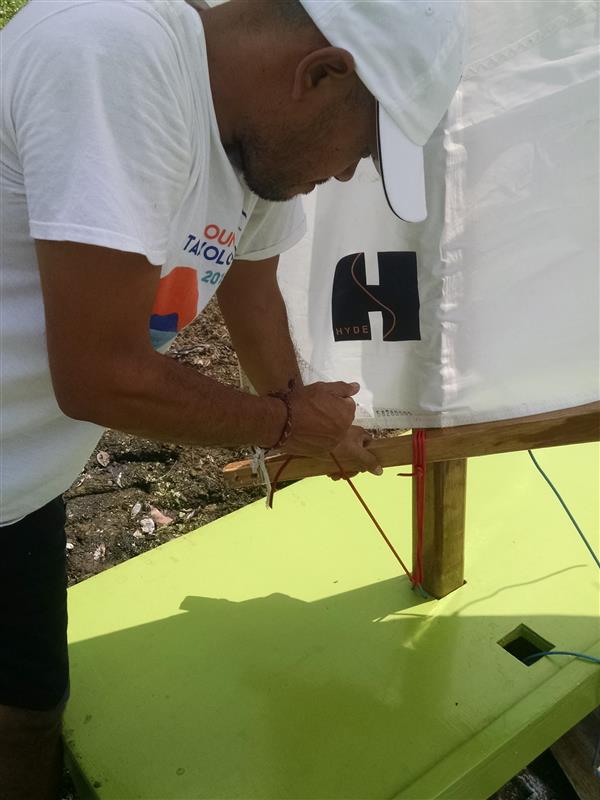
Finally the downhaul is tied off with two or three half hitches. If someone ties more than three you are entitled to think (quietly) “amateur” 🙂 Excess rope is pushed down the extra hole or just dropped into the front of the cockpit.
We have changed where we put the final knots now . We take it back over the top of the boom and tie uner. Then tie two half hitches tight and close under the boom. Much easier to undo after sailing or adjust on the water

Two Half Hitch knots used to tie off. They go around all the ropes of the downhaul to tie them in a bunch. Not just one. This squeezes the boom which really makes it unlikely that the downhaul can ever slip.
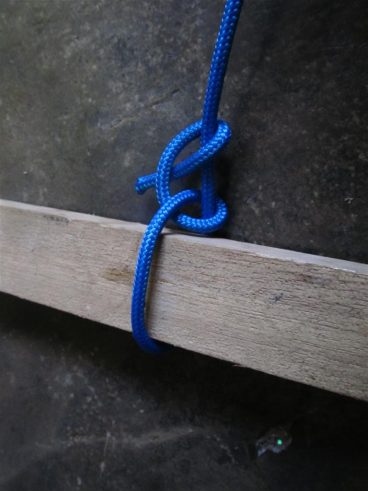
The Preventer/Bleater
- Preventer – 4mm spectra with polyester outer – 600mm (2ft)
The preventer is the final rope at the front of the boom. The Goat Island Skiff guys and I like to call it a “bleater”. Would that make it a “honker” on an Oz Goose?
GOFAST tip – The Preventer has two functions. One is to prevent the boom from going forward under mainsheet or downhaul pressure. Second is more important than I imagined … it is to keep the boom close to the mast.
I underestimated the importance of keeping the boom close to the mast, but racing has shown it to be essential. For every 50mm gap between mast and boom appearing with the gusts means the sheeting angle is changing a degree.
Thinking about normal sailing … how often do you adjust the sheet to move the other end of the boom 50mm or 25mm. Definitely don’t want the sail sheeting in for the gusts and easing out in the lulls. Exactly the opposite of what is needed. If 10 degrees is somewhere near optimum for upwind sheeting angles 10% variation is too much – particularly if it is unstable.
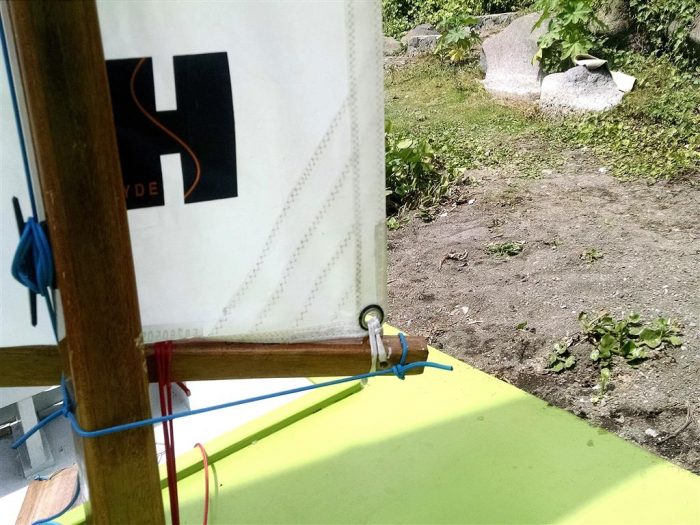
Here the preventer/bleater is the blue rope in this photo that is tied around the boom. Here behind the downhaul with a bowline that can slide on the boom. The other blue rope in the photo is the halyard.
Another small change – the bleater in this photo is behind the downhaul. We put it in front now but still follow the same method otherwise.

The preventer bleater is passed through the front hole in the front of the boom. It is tied so distance between the sail’s corner eyelet and mast doesn’t become bigger than 250mm (10″). And not much less than 8″ (200mm).
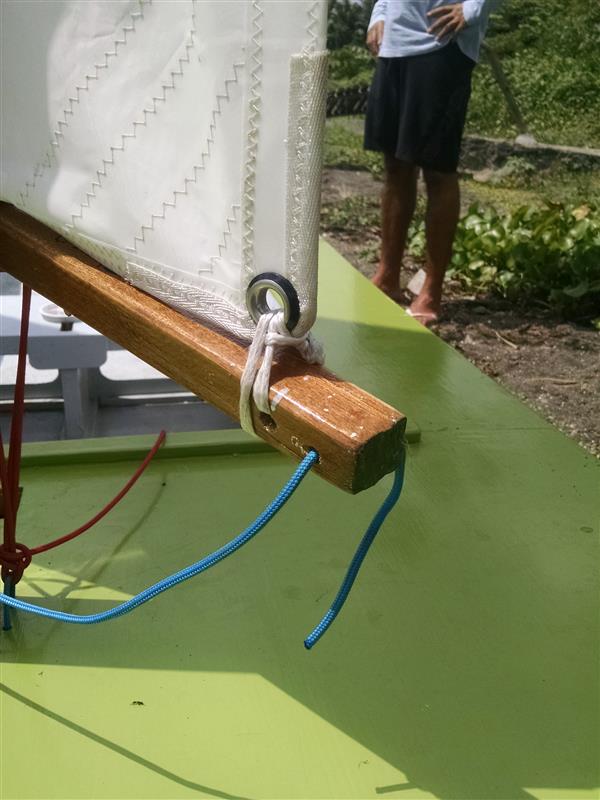
The end is then tied around the boom with two half hitch knots.
Remember we can quietly call anyone who ties more than two or three half hitches an Amateur 🙂
Rigging the Mainsheet to control the Oz Goose Balance Lugsail
- Mainsheet – 6mm double braid polyester.
The mainsheet (a softish “double braid rope”) of 6mm (1/4″) diameter is used to control the large mainsail. We have found that very adequate for the Goose. For the bigger Goat Island Skiff mainsail (105sq ft) all ropes are the same size as here except the mainsheet goes up to 8mm. 6mm is fine for the goose. Using larger means the mainsheet blocks will be twice the price or more.
Beginner and intermediate sailors can tie the stopper know (safety knot) so that the boom stops at less than 90 degrees to the boat centreline.
See our article on the use of a safety knot here. It relates strong to learning to sail or learning to sail better!
To get the best performance from a balance lugsail on a unstayed mast the mainsheet should be long enough to allow the boom out a bit more than 90 degrees to the angle of the centreline. Maybe as much as 10 to 15 degrees further than that for experienced sailors only.
We use the method below of putting the load directly into the mainsail and keeping as much load out of the boom as possible. The fixed end of the mainsheet is tied through the eye in the back corner of the sail with the boom inside the same loop. The loop should be small enough to keep the sail eye quite close to the boom.
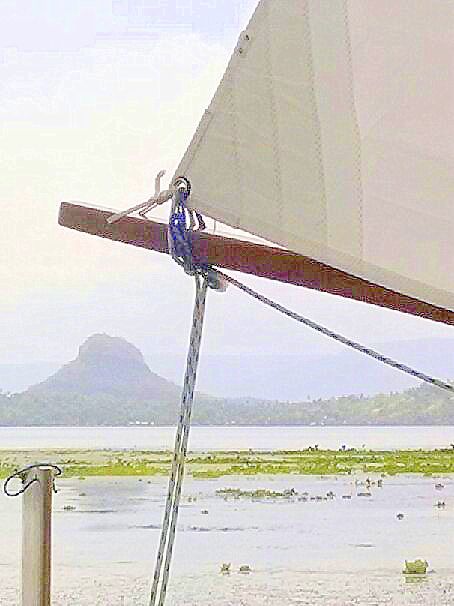
The lashing for the mainsheet block (pulley is also tied around the boom passing through the sail eye. This means all tension from the mainsheet is directly applied to the sail.
Sorry about the quality of this photo. I will replace it. It is the back end of the boom. It shows the mainsheet is separate to the pulley attachment rope. Both go through the sail eye and both are also completely around the boom.
Make sure the lashing for the block is set up so the block is oriented correctly relative to the direction the mainsheet wants to go.
Setting up Mainsail Foot depth
This also applies to the front sail of any normal boat. On the OzGoose, OzRacer and PDRacer it is the mainsail.
BEST GOFAST TIP – the front sail on a boat always needs some depth in the bottom of the sail. It should not be pulled tight.
The bowline in the end of the mainsheet that goes around the boom needs to be quite small so the sail is kept near the boom.
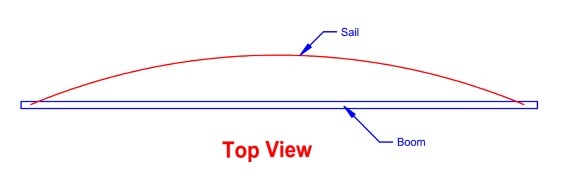
The Outhaul rope is loosened to give the bottom of the sail a nice curve. A 1 in 10 curve for the bottom of the sail at the front of the boat is the right range. Measure it about 300mm (1ft) above the boo The following is a sketch of the top view to see if you have enough curve in the bottom of the sail.
GOFAST TIP – a ratchet block can be used to reduce the load of holding onto the mainsheet in stronger winds. They are not cheap, but they really help efficient sailing (and wear and tear on your hands)
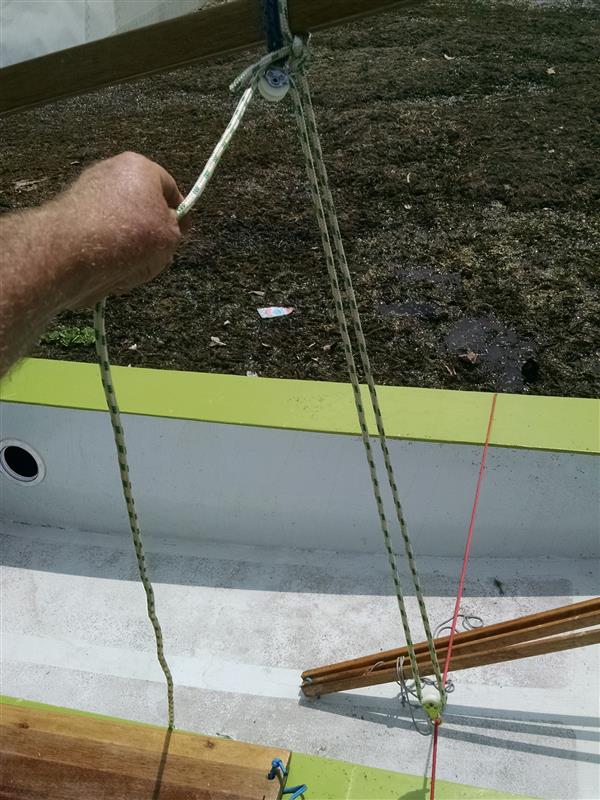
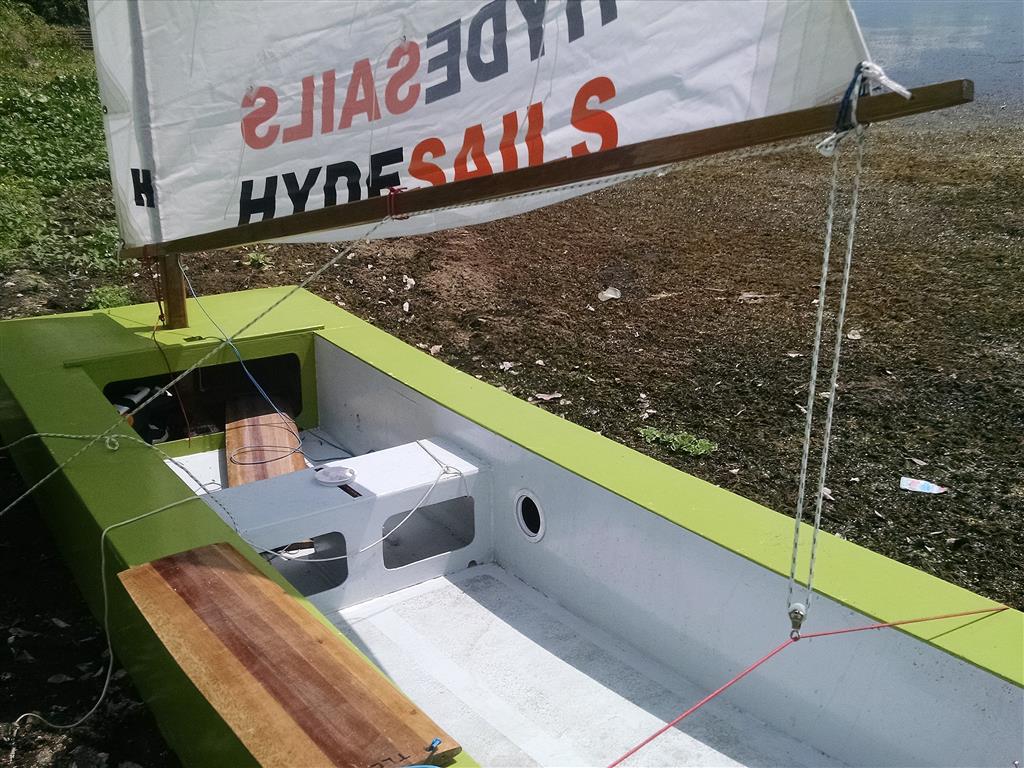
So to run through the system – photo below – the fixed end of the mainsheet is tied through the eye at the back of the sail with a bowline (again). Then it goes down through the block on the traveller. Then back up to the block on the boom that is also tied through the eye at the back of the sail. It then travels forward to the block that is placed on the boom vertically above the back of the seat. The end is then tied off so it cant be lost by tying around the hiking strap in the boat or some other structure. That way, if it is dropped it can still be reached.
One tip is that the front block can slide toward the back of the boom. We just put a stainless steel screw (1″ x 10 gauge with flat or countersunk head) behind the rope it is lashed on with to block the rope from sliding back.
Setting up the rudder and centreboard for the Oz Goose
- Rudderfittings – we like a single pin system to go through all the rudder fittings in one swoop. If that is possible as it distributes the loads better than separate top and bottom pintles.
- Shockcord/bungee – 6mm for rudder retaining loops and to tension centreboard so you can set it to height
- Tiller swivel – 4mm spectra with polyester outer
- Handles for centreboard rudder – 4mm line or leftover outers from the corner lashings if they were stripped.
The rudderbox height is set by making sure the tiller has a clearance above the top of the transom of about 19mm (3/4″).
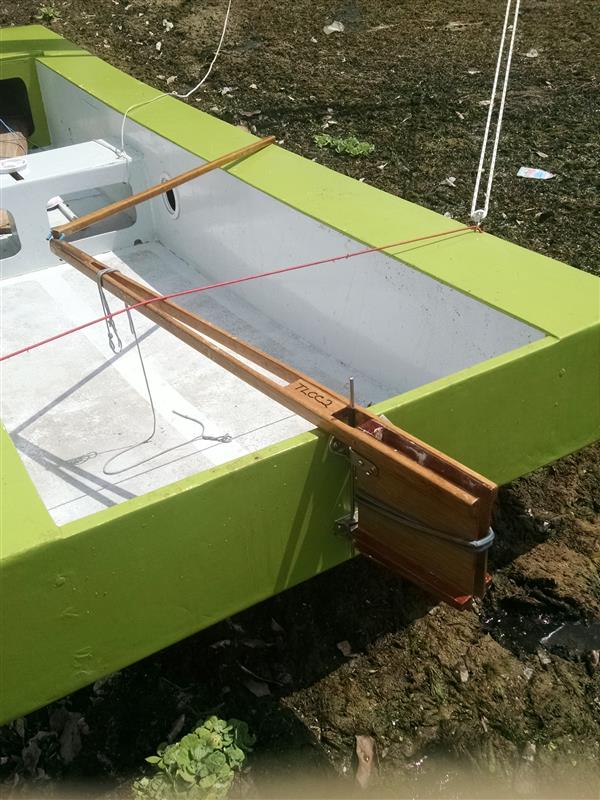
The tiller and extension must pass under the traveller. We all have forgotten it at some time and it is no fun at all to get it wrong. Usually means rushing to shore only partway under control. So get it right. This way the mainsheet block can slide right over the tiller without any problems. Sorry about the grey rope being in the photo. It is meant to be a loose rope through the handle of the rudderblade and around the tiller so the rudderblade cannot be lost.
The shockcord/bungee rudder blade retainer is a minimum of 6mm diameter. Real shockcord is much better than bungee bought at the hardware. It can be two separate loops. They need to be quite tight when the rudder is in place. The front of the bungee has moved up in this photo. It needs to be close and parallel to the timber reinforcing at the bottom of the rudderbox (as low as possible) to have the maximum power.
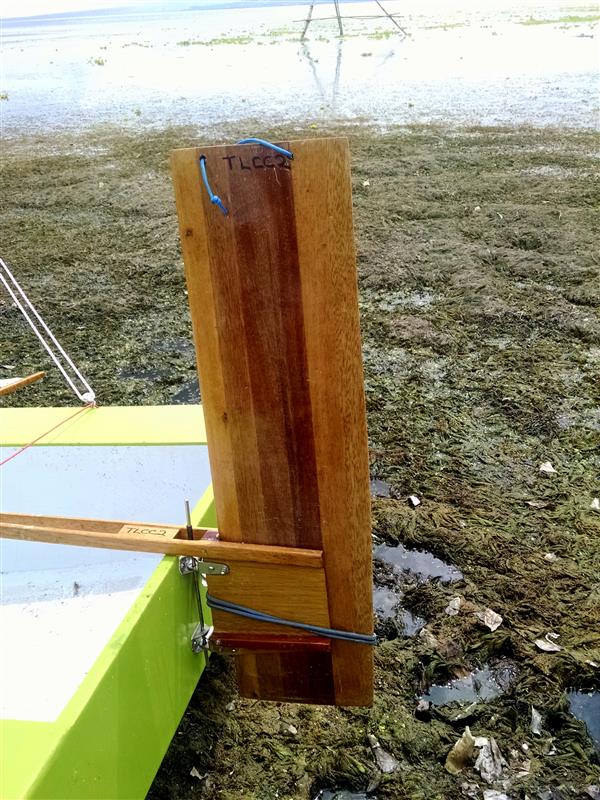
The handles at the top of the centreboard and rudder are just spectra loops with figure 8 knots in the ends. Note how they are tied so one Figure 8 knot is on each side of the board. These knots stop the boards from being pushed down too far. the holes are 5mm about 125mm (5″) apart.
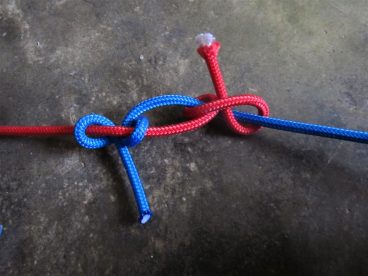
It is not easy to tie knots in bungee. The most effective knots are three half hitches pulled really tight. We use a modification of the Fisherman’s Bend Knot but with lots of half hitches. I’ve heard good reports of the “Zeppelin Bend” for shockcord.
Fisherman’s Bend Knot
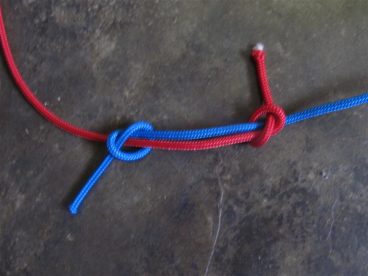
Our “modification is just to add several more half hitch knots. Finally it is not “amateur” to do so 🙂
The tiller extension is attached using a short piece of rope with a Figure 8 knot top and bottom. For experienced sailors it is floppy and a bit annoying, but most of the best sailors just get used to it. The reason behind it is both trying to keep the cost down and to use what is available in the Philippines and other more remote areas. With 100 boats here, the $20 totals $2000. And many of our sailors have a daily wage of $10 to feed their families.
If you want a manufactured one the simple flexible polyurethane ones are way better than the stainless steel mechanical ones – lighter and less prone to jamming. But you will need a hollow tiller extension to fit the polyurethane type – see how complications add to one another to make the boat more expensive – a fancy swivel means you need a more fancy tiller.
Anyway, here is our “el-cheapo” knot version. Make the knots as close together as possible by pulling the rope through the knot bit by bit. 4mm spectra through 5mm holes.
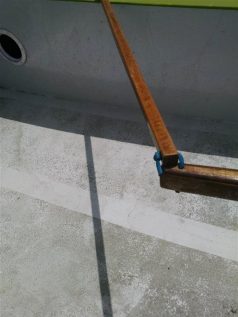
The centreboard has a rope handle just like the rudder.
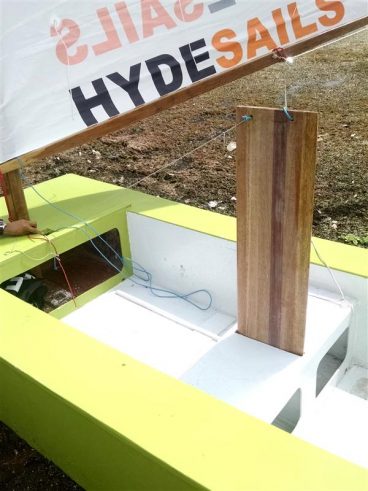
The 5 to 7mm diameter bungee/shockcord it tied between the handle on the centreboard and the base of the mast – use lots of half hitches pulled tight to secure the bungee. If it has the right tension the centreboard will stay at whatever height is required.
GOFAST TIP – A little trick when raising or lowering and raising the board is just to pull the top so the board is vertical and then it will slide easily. If the bungee is allowed to pull the top forward then the board will be hard to move.
Single most important tip for sailing
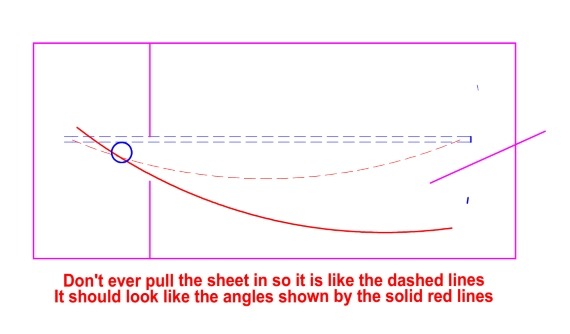
People who have sailed boats with jibs often get the angle of the boom wrong when sailing upwind. The boom should never come in to the centreline. This drawing give an idea of the tightest ever angle that you might pull the sail in.
People who have sailed on boats with Jibs do have to pull the mainsail in tighter than this. But in this case the sail is the front sail, so it need to have a wider angle like a jib.
Rigging The OZ Goose on Beach to go sailing is much faster – 7 mins is typical.
This Video covers the rigging process each time you take the boat sailing.
For information on Building and sailing an Oz Goose
- BUILDING VIDEOS -Our Step By Step How to Build an Oz Goose Sailboat
- Building the Oz Goose sailboat for peanuts
- Some of the sailing performance of the Oz Goose
- Video – one of our Regattas – 17 boats – this year 32 boats!
- How the Oz Goose goes together – CAD drawings
- Ropes sizes and Fittings needed for the Oz Goose and a Supplier
Interesting :). What you call a bleater or honker is in my case a bit of Spectra wrapped around boom and mast and tied off with a reef knot. Yours is a bit more complex in that it careers off to the fore end of the boom.
I like the block-less downhaul – how about two downhaul loops between boom and deck loop (saddle n ,y case?) for extra purchase?
Another query – is it “balance” or “balanced”? There sems to be wide variation in the use of this term.
Cheers,
Alex.
Hi Alex, nice to see you here.
This is meant to be the simplest guide for a non adjustable lug rig. If someone wanted a more adjustable rig they could add an adjustable downhaul and outhaul.
The single loop works fine to get lots of purchase. No problem getting the whole setup humming tight in strong winds.
Both Balance and Balanced sound OK to me. Nautical terms are derived from so many countries and, maybe in some cases, villages. So I think we can get away with either.
The bleater/preventer is used because later it will open up opportunity to move the boom attachment of the downhaul aft for a boom vang effect. Also it is a much faster method to tie up than the square lashing.
MIK
Hello MIK,
Thank you for your very prompt reply – and very useful info :). Interesting about the aft-wards downhaul “vang”. Will play about with that if I ever get the ‘Duck back onto the drink – and in some decent wind. Will also try out the mainsheet outhaul and halyard repositioning the next time that I do some vicarious “land sailing”.
Regarding sailing in more boisterous cnditions, I *must* get the reefing nettles sewn onto my shiny new RSS lugs’l ;). It has occurred to me that the clew and tack of each reefing bundle aren’t secured (same as with my old polytarp sail) – or is that (yet another) misinterpretation on my part?
I’m afraid that I’m one of the > 3 half-hitch amateurs that you talk about (although usually to deal with excess line ;).
Cheers,
Alex.
NO SEWING Alex 🙂 !
If you want nettles they just go through the holes already in the sail and are knotted each side of the sail so they don’t fall out.
Or you can use a length of shockcord with a loop in the end instead.
Do the main reefing lines at luff and leach.
The loop drops over the front end of the boom goes through the luff reef eyelet that is in use, under the boom through the first small reefing eyelet in the sail, under the boom, through the next small reefing eyelet, under the boom and then is pulled reasonably tight and ties off to the main reef eyelet in the leach.
Only one knot to tie and you don’t have to mess with finding the ends of the tingles. Plus if the main reef lines ever let go through accident or misadventure the shock cord will stretch or break so you don’t rip the intermediate reef eyes out of the sail.
This is a method stolen from ocean racing.
Thank you very much, MIK. I’ll have a dig through my box o’ spares and see if I have ant shock cord left. Thete’s a chandlery down in Penrith anyway.
We have had very blustery weather over the last two days; even with two reefs the little ‘Duck would probably make heavy going of it.
Cheers,
Alex.
Hello MIK, yet another infernal question: regarding the Common-or-Garden Mk II Oz Racer, in comparison the the Oz Goose rig, should I be adding a block around the centre of rhe bom, or does the shorter boat-length make this not relevant? (I am also assuming that the Goose’s sail area is larger than that of the Oz Racer, judging by the apparent lengths of the boom and yard with respect to the Goose’s hull length.)
Another, clearer, photo of the mainsheet/tack/boom complex would ineed be very useful!
Cheers,
Alex.
Hi Alex,
I answered privately, so I’m repeating it here.
There are two good reasons for the middle boom block on the Goose.
1/ the Oz Goose being 12ft long vs the 8ft OzRacer means the helmsperson spends a lot more time away from the transom. So the mid sheeting is good for that. With the OzRacer you are so near to the back of the boat most of the time.
2/ The OzGoose has a much greater capacity for people without damaging the sailing speed. It is very happy with three adults aboard. We normally teach this way even in light morning winds on Ta’al Lake and we teach the beginners to spot the gusts and sail between them to max speed all the time. The boat really responds well.
So given that we are sailing in teaching mode a lot of the time the centre boom drop for the end of the mainsheet is ideal for teaching. One beginner forward can sheet and the other can steer, or instructor can sheet while all the beginners get a handle on steering or tacking angles. And nothing ever gets tangled up.
FINAL – one of the big advantages of the aft sheeting for the OzRacer is the neatness of tacking through the tack. Both mainsheet and tiller extension can be put in one hand normally my front hand and if I face backwards in the tack, both end up in by back hand with no tangles. Grab the sheet with my front hand, and all is sweet.
Note this assumes you are using the cross body tiller extension hold.